The best way to record video on your iOS or Android device is to use our TORSH Talent mobile app. Our mobile app automatically compresses videos as they record, reducing them to a smaller file size than if you were to record on your native Camera app.
Contents:
II. Logging into the Mobile App
III. Recording in the Mobile App
IV. How to Switch Systems in the Mobile App
V. Videos & Files Management in the Mobile App
VI. Video and File Syncing in the Mobile App
VIII. Importing Videos & Files into the Mobile App
X. Commenting on Videos & Files in the Mobile App
X. Sharing Videos & Files in the Mobile App
Downloading the Mobile App
You can download the TORSH Talent mobile application on any iOS or Android device. To download the app, navigate to the App Store or the Google Play store on your smart device, and search for TORSH Talent. You can also use the following links which will take you directly to the app in the App Store or in Google Play Store.
NOTE: This app is for mobile devices only. You cannot download the app on your computer, so make sure to access those links from your mobile device or tablet.
Logging into the Mobile App
The first time you access the TORSH Talent Mobile app, you will be prompted to log in. Your login information will be the same one you use for the TORSH Talent web application. Unless you log out of the application, you will not be prompted to log in again. For users who are using shared devices, we suggest intentionally logging out after each use, so you are only accessing the video and files associated with your account. If you forget to log out, the next user may unintentionally upload videos to your account.

Recording in the Mobile App
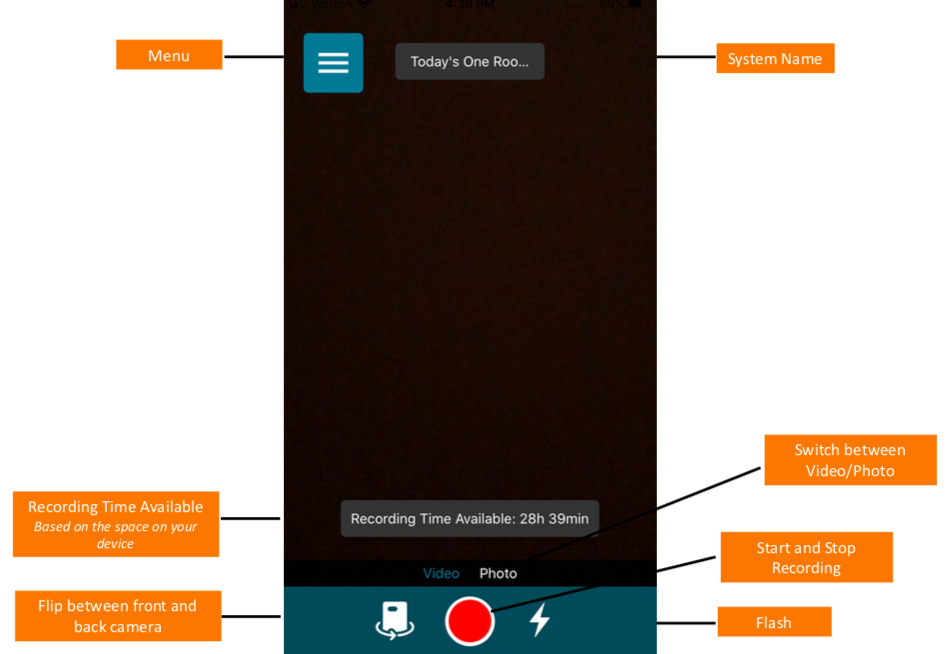
To access the camera view, tap ‘Camera’ from the menu. If you want to capture a wide-screen view, make sure you rotate your device before recording. To start and stop your recording, press the red record button.
- Front/Back Camera View - To the left of the record button, you can flip between your device’s front and back camera before recording. To the right of the record button, you can choose to enable your camera’s flash.
- Photo Option - Right above those three buttons, you will see the option to capture video or take a photo. Be sure to select for your desired function.
- Recording Time Available - On the camera screen, you will also see ‘Recording Time Available.’ This time is based on the available space on your device. As you capture and delete video, this time will change. If you need more recording time, try deleting old apps, videos, and pictures to free up space on your device.
- System Name - On the top center of the recording screen, you will see the name of your system.
- Menu Icon - On the top left side, you will see the Menu icon.
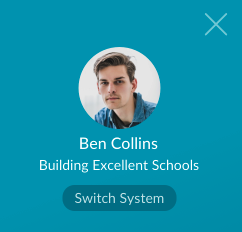
How to Switch Systems in the Mobile App
If you are a member of multiple systems with the same email address, you will be able to choose the system you want to record and upload to by clicking the ‘Switch System’ button on the menu.
Videos & Files Management in the Mobile App
To access your Videos and Files, navigate to the menu icon in the top left corner of your app and select, ‘Videos and Files.’ Your Videos and Files page shows all of the artifacts you have access to, including those on the web platform. You can also view their sync status. Using the icons on the page, you can also filter and sort your files to quickly find what you are looking for.

Video and File Syncing in the Mobile App
When a video or file is uploaded from the mobile application to the TORSH Talent platform, it is automatically synced. This means that the artifact appears on both the web and mobile apps. This icon will also appear for videos/files you have manually synced.

When a video or file is uploaded from the web application, you can see it and perform actions on it via your mobile app when you have an internet connection. If you are going to be offline without any connection, for example, when you are traveling, you may want to download the video or file to your device. Once it is on your device, you will be able to see it, even if you do not have an internet connection, and comment on the video.

To sync a video or file from the web application, with your mobile app, click on ‘Download to Device’ from the actions menu on the video/file. Your video or file is now stored on your mobile application and will be accessible when you are offline.
If you want to delete any videos or files from your mobile application, select ‘Delete from Device.’ You can also delete it from only the web app or from both the web and mobile applications using the actions menu.

Video/File Actions Menu
When you tap on the gear icon of a video in the TORSH Talent mobile app, you will view an actions menu that will vary depending on the state of the video or file and your connection status. If a video or file is synced you will see an extensive list of actions (pictured here).
If you are trying to access a video or file that was uploaded from the web application that has not been synced with your device, you will only have the option to ‘Rename,’ ‘Share,’ ‘Download to Device,’ and ‘Delete from Web App.’
If you are not connected to the internet, you will only see videos or files that are synced with your device. In this case, the options in your actions menu will be ‘Rename,’ ‘Share,’ ‘Save to Photo Gallery,’ ‘Delete from Device,’ ‘Upload,’ and ‘Details.’ Any actions you take will sync once you are back online.
- Rename - Change the name of your artifact
- Share - Share the artifact with a user in your system
- Download Another Copy - Create a new version of the same artifact, choosing to either keep or omit existing comments or rubric tags on your device.
- Delete from Web App - Delete your artifact from torshtalent.com or hs.torshtalent.com, but maintain a copy on the mobile application
- Delete from Device - Delete your artifact from your mobile application, but maintain a copy on the web application
- Delete from Mobile and Web - Delete your artifact from both the mobile and web applications
- Save to Photo Gallery - Save the artifact to your device
- Upload Another Copy - Create a new version of the same artifact, choosing to either keep or omit existing comments or rubric tags on the web application.
- Details - Learn the file size of your video or file
Importing Videos & Files into the Mobile App
If you forgot to capture video or photos using the TORSH Talent app and instead used your device as a regular camera, don’t worry, you can still import these videos from your camera roll. On the top right side of your Video Library, select ‘Import.’

You may be prompted to give the app access to your camera roll, select ‘OK.’ From here, you can select the video or photo you’d like to upload to TORSH Talent. It takes a bit longer to compress and upload videos from your camera roll, so we suggest using the TORSH Talent mobile app to capture video every time to save time.

Video Page Interactions
When you tap on a video in the TORSH Talent mobile app, the video will automatically play. If you want to manually control how the video is played, you can toggle the ‘Auto Scroll’ switch. On this screen you can view and leave time-synced or summary comments, view rubric tags, and share the video. *Files and photos are view-only
Commenting on Videos and Files in the Mobile App
To comment on a video on the TORSH Talent app, click on the video from the Videos & Files page. The video will automatically play and at the bottom of the screen, you will see the option to leave a Time-synced Comment or Summary Comment. Choose your option and the video will pause. Type your comment and click comment. The video will continue to play. You can also reply to existing comments by clicking on the gear icon next to the comment and selecting 'Reply'.
Sharing Videos & Files in the Mobile App
In order to share a video/file on the TORSH Talent app, first, navigate to the Videos & Files page from your navigation menu. Scroll to the video you would like to share and tap on the gear icon in the upper right-hand corner. Click ‘Share’ from the actions menu.

Choose the type of user you would like to share with (Users and Groups, Observers, or My PLC) and then start to type in who you'd like to share with. Once you've selected a user, set your sharing permission, type a message if you so choose and tap 'Share with Users.'
To edit who your video has been shared with, select their name from the Share screen, and either modify their permission or unshare the video/file.
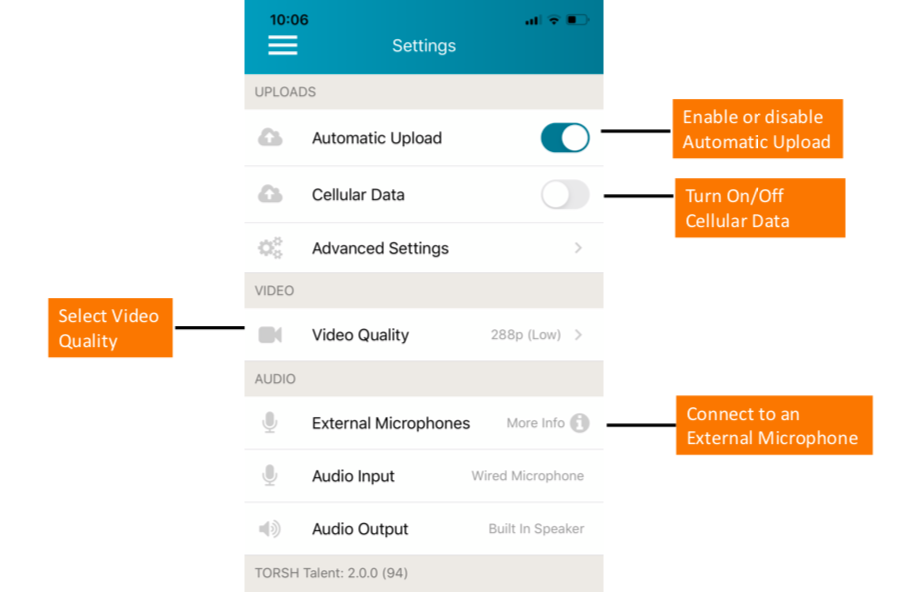
Mobile App Settings
To access the app's Settings, navigate to the menu icon in the top left corner of your app and tap ‘Settings.’ From this page, you can enable or disable ‘Automatic Uploads’ to choose if you want to allow the videos that you record to be uploaded automatically to your account.
If you're using a phone or a tablet, the audio input and output will automatically pull from your device's built-in microphone and speaker. You can use an external microphone or speaker by connecting a wired microphone to your device or by pairing your device with a Bluetooth microphone or speaker.
In addition, you can enable or disable ‘Cellular Data’ to upload without using WiFi. Standard data rates may apply. You can also alter the settings for ‘Video Quality;’ however, the higher the video quality, the larger the file will be, and the longer it will take for the video to upload.
Rather watch a video? Check out how to get started with the TORSH Talent app here. HIPAA users, click here.