In TORSH Talent, Network Admins are responsible for creating and maintaining multiple systems, managing users, and enabling Networked Professional Learning Community (PLC) collaboration settings across their designated Network. Your expertise is crucial in maintaining a reliable and efficient network architecture that
facilitates seamless collaboration among your users across all systems.
Below we have detailed many of the major important features that a Network Admin can manage across the systems of their Network and how.
NOTE: If you would like to interact with users - sharing videos, managing coaches, etc. - we recommend doing so from a separate System Admin account inside each system. Network Admin accounts are strictly for managing systems and users, not interacting with them.
Management Panel Settings
There are two ways Network Admins can access the ‘Management’ page of Talent:
- Click on your profile icon from the navigation toolbar and select ‘Management.’
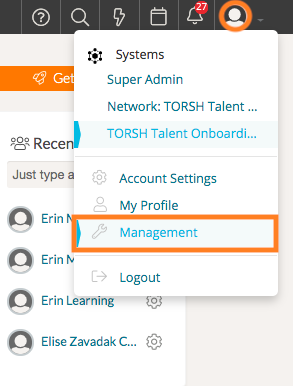
- Click on ‘View’ on the top right of the Management Panel on your Talent home page.

Managing Systems' Settings in Your Network
a Network Admin, you can manage the settings for all of the systems in your Network by clicking ‘Systems Settings’ in the Management panel. Once there, choose the desired system you would like to modify and click on the ( ![]() ) button. This will load a new page wherein you can choose the desired settings for the system. You can also manage certain settings for Coaching and Sharing here. You can even create aliases for certain labels and user roles in Talent.
) button. This will load a new page wherein you can choose the desired settings for the system. You can also manage certain settings for Coaching and Sharing here. You can even create aliases for certain labels and user roles in Talent.

To create a system, first login to Talent and select 'Systems Settings' from the Management Panel found on your home page.

On the Systems Settings page, you will find all of your current enabled/disabled systems within your Network. To create a new system, first type in the name of the new system in the 'Create A New System' field and assign a User Limit for the system.
NOTE: The 'User Limit' for each system in your Network is based on the total available licenses in your overall Network.
Once you have made these adjustments, click the blue 'Create System' button, and your system will be created.

Once the new system is created, you will receive a confirmation message and the new system will appear in your Systems Settings list. The Systems Settings list is sorted alphabetically and you can always filter your systems by System Name.
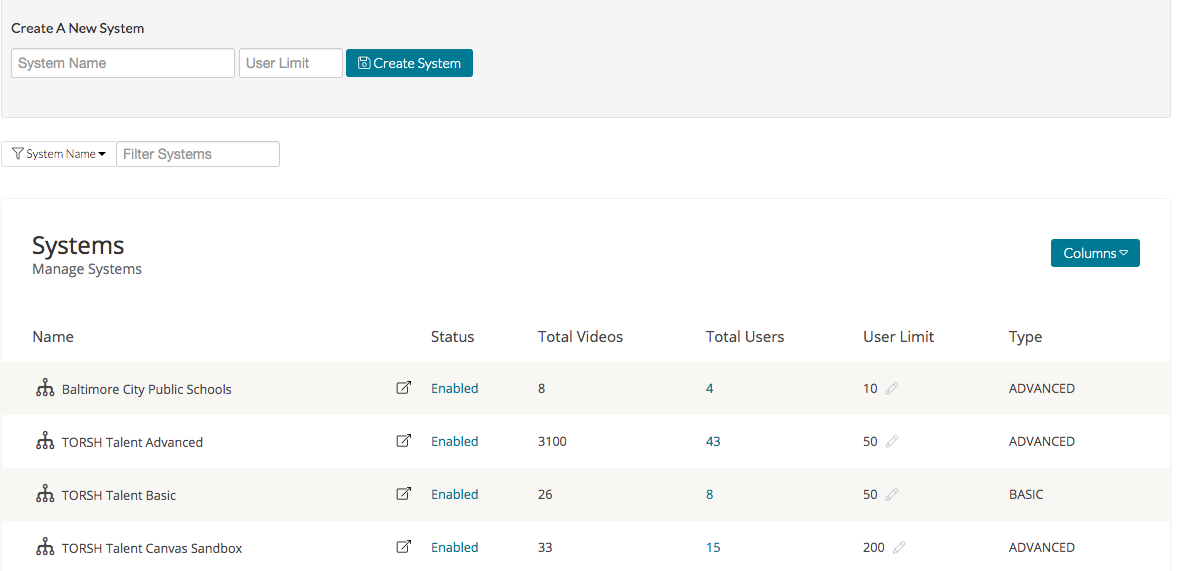
Now that the system is created, use the 'System Details' button ( ) to edit your specific system's settings.
To disable a system, click on 'Enabled,' and it will immediately disable the system and appear as 'Disabled' instead. When you disable a system, the user accounts of that system will not be able to access their accounts in that specific system.
Networked Professional Learning Community (PLC)
A Network Professional Learning Community (PLC) is an organization-wide connection for collaboration across TORSH Talent Systems within a network. Each system in TORSH Talent is closed and private, meaning that only people who have been invited to create an account can view, access, and use resources in your Talent system. With a PLC in use, exemplar resources, videos, files, forums, and video calls can be shared across systems.
To enable the PLC connection between systems, navigate to your Management Panel and select 'PLC.'
Here you will find all of your systems listed. You can then choose to include all systems in the PLC by toggling the ‘Enable All Systems’ option or you can individually select the systems you'd like to include. Click the button (see below) to the right of the systems' names to enable those that you want to participate in your Network PLC.
![]() Included in PLC
Included in PLC
![]() Excluded from PLC
Excluded from PLC
Network Settings
As a Network Admin, you can view the overall settings applied to your network - such as your overall User Limit - as well as the default settings for your systems by viewing the ‘Network Settings’ panel.
Changing these default system settings will not affect existing systems in your Network, but it will apply to any new system created moving forward.
Users Management and Purchasing Licenses in Your Network
When you open ‘Management,’ you will be brought to the ‘Users’ page by default, where you can invite new users to your system. Before inviting users, we suggest creating your ‘Groups’ so users are invited directly to their specific group(s).
To invite new users, click the ‘Invite New Users’ button. You can then invite users per system, based on their role and group(s). Admins are the only users who cannot be restricted to a group because they can communicate with any user in the system. Once you’ve inserted all the email addresses you’d like to invite, click ‘Send email invitations.’

On the Users Management page, you will also find a list of all of the users in your network. You can edit a user by clicking on the 'gear icon' in the ‘Actions’ column of their row.
From here, you can edit the user’s name, their role, and the groups they are a part of by clicking on the corresponding pencil icon. If a user needs to change their email address, please have them contact support@torsh.co .
This page is also where you can ‘Disable’ a user, send them a link to reset their password, or ‘Delete a User.’ If you disable a user, you are temporarily denying them access to their account. If you delete a user, you are freeing up a Talent license and all of the user’s videos and files will be deleted as well.

On the Users page, you will also see a ‘Columns’ button. Click this if you want to change up the columns you see in the chart on your Users page.

If you would like to perform Bulk-Actions on multiple users, multi-select the users by clicking their associated check boxes, then click ‘Bulk-Actions’ and choose the action you’d like to take from the list below.

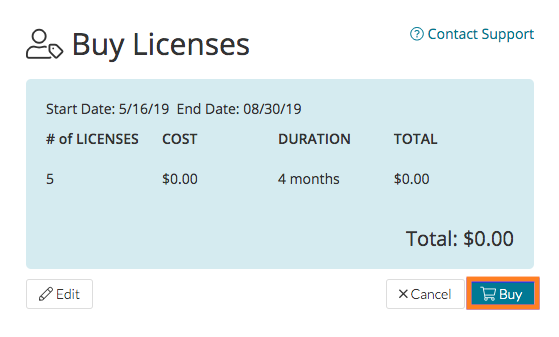
You can also purchase additional licenses on this page by clicking on ‘Buy Licenses.’

Next, insert the number of licenses you'd like to buy along with the end date. Please note that the end date cannot be after your system's contracted end date. Once that information is in, click 'Review Order.'
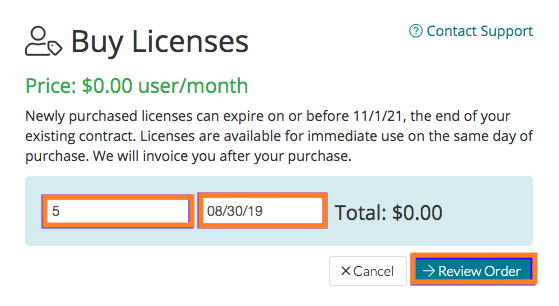
Once your purchase is ready, click 'Buy' and we'll send you an invoice! If you need to edit your purchase, click 'Edit.'
Groups Management
Groups are how users communicate with each other within a Talent system. In order to share artifacts, give feedback or receive feedback, users must be in the same group. System Admins may want to group users based on school, grade level, content area, or whatever else works for your organization! You can create as many groups as you want, and users can be in multiple groups. As a Network Admin, you can aid in the creation and management of groups in your systems.
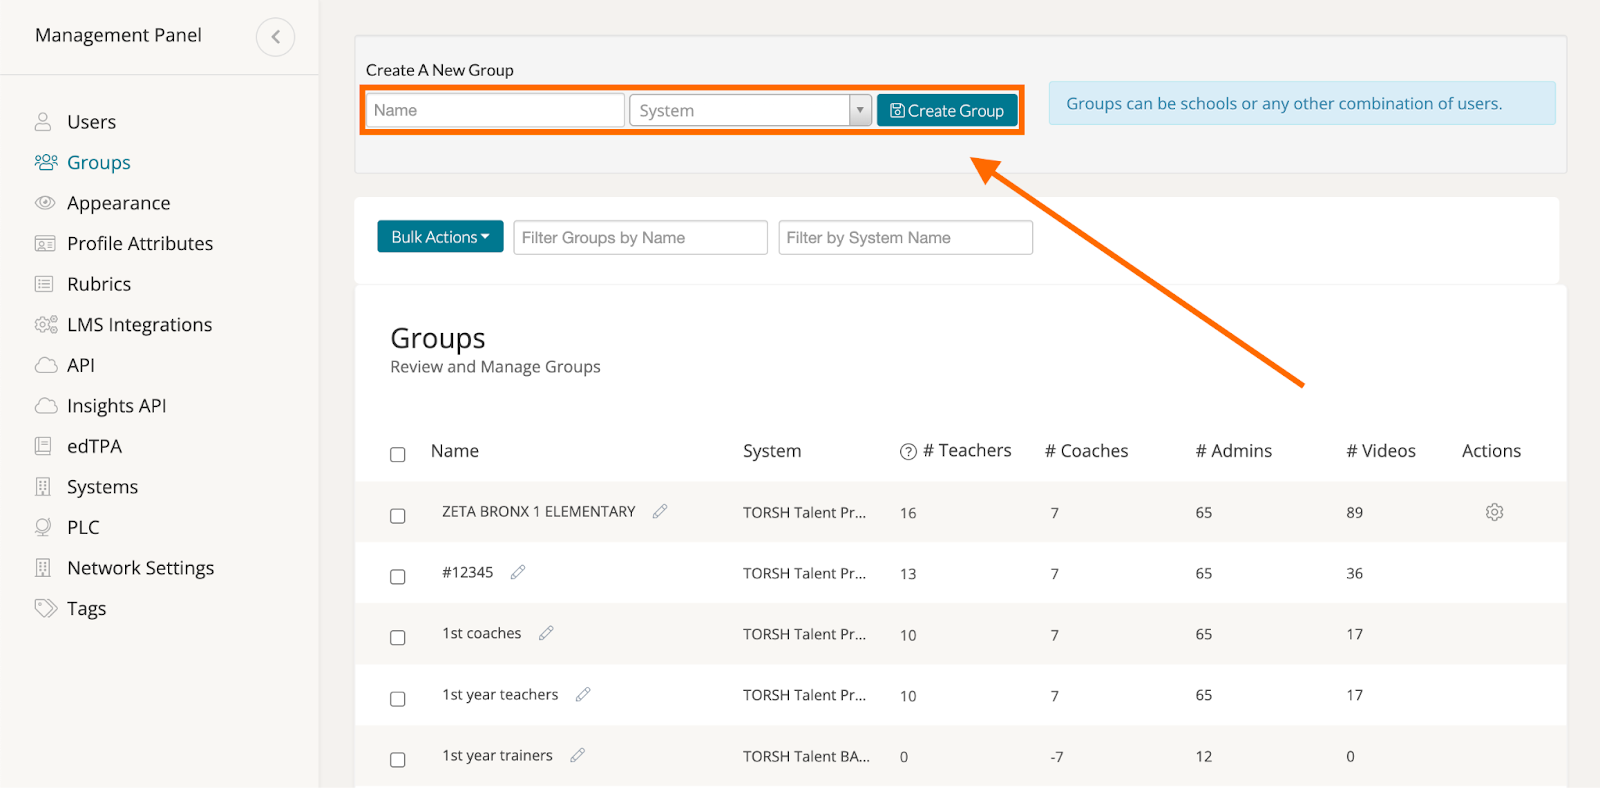
We generally suggest the workflow of creating groups before inviting users. Once on the Groups page of your Management Panel, simply type in the name of the group you want to create, and select the system you would like to assign it to. Then click the blue 'Create Group' button.
Once the user group is created, it will live in the 'Groups' list where you can then review and manage it. To change the name of the group, simply click on the 'pencil icon' next to the group's name, and type in the desired name. Click the 'checkmark icon' when you're done.
To delete or modify a group, hover over the 'gear icon' on the group’s row and click either 'Delete' or ‘Modify.’
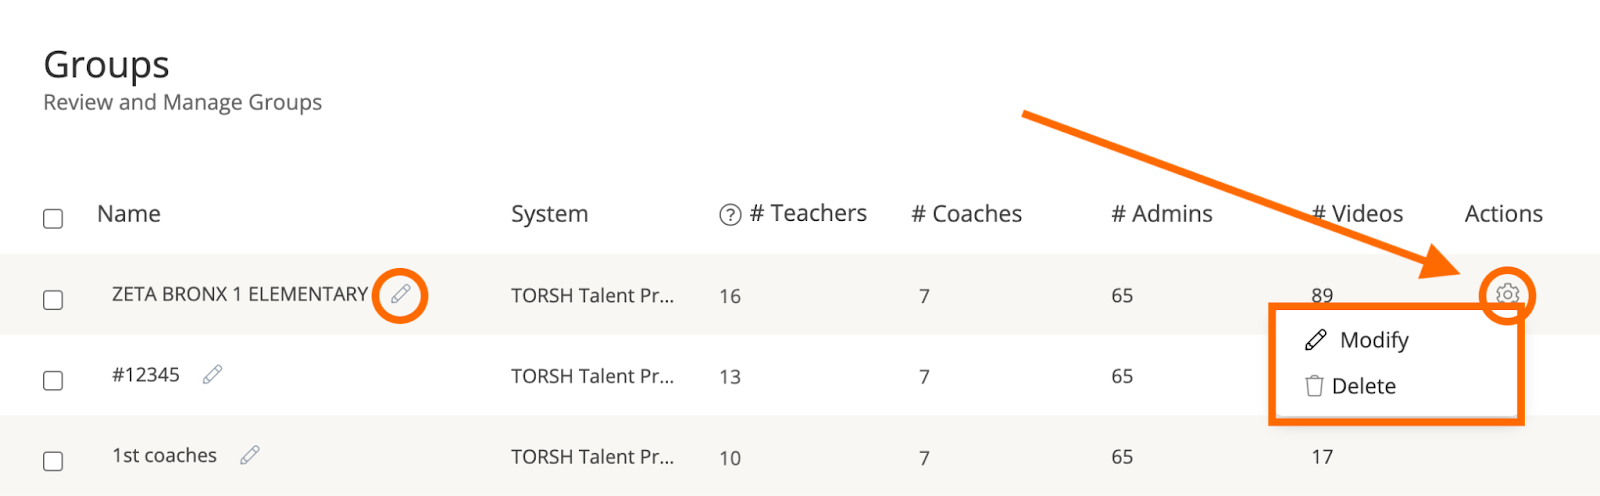
To modify the members within the group, click the 'Modify' button. A new page will open up where you can 'Remove' and 'Add' members. To do so, click on the desired members then select 'Add' or 'Remove' to add them to the 'Members' or 'Non-Members' list. Once you've made your changes, click 'Apply.'

System Appearance
NOTE: Only Network Admins and Admins of Premium and Advanced systems can customize their system’s appearance.
As a Network Admin, you can adjust the aesthetic colors and logo displayed for your systems. On the 'Appearance' tab of your Management Panel, select the system you would like to modify from the dropdown. Once selected, under ‘Branding,’ you can upload your school or organization’s logo by selecting 'Upload New Logo.' The logo will appear on the Talent header for everyone in your system. You can also upload a photo for the header of your system's 'edTPA Portfolio' page, if your system has that feature enabled.

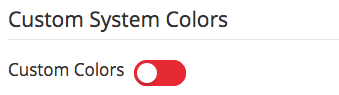
You can even customize the colors of Talent to match your organization's branding by turning 'Custom Colors On.' You can either select the specific color you like using the color palette, or if you know the specific color code, you can enter it in the appropriate text box. You can change the background color and the text colors of the header, as well as the background and text colors for primary navigation, secondary navigation, and buttons.

The changes will be made in your system instantaneously. When you view a video, you will notice that the video timeline color also changes to match the primary navigation colors. You can always revert to the original Talent colors by turning 'Custom Colors Off.'
You can remove the Header logo or the Portfolio header image by clicking the red 'Remove current header' button underneath the image.
Profile Attributes
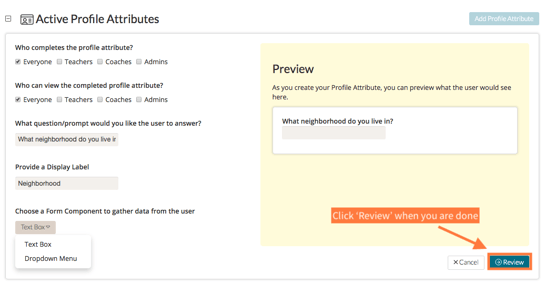
Network Admins/Admins of Premium or Advanced systems can determine what Profile Attributes they want each role type to fill out for their Talent profiles upon activation. To do so, admins can navigate to the ‘Profile Attributes’ tab of the Management panel. Next, select the system you would like to modify from the dropdown list. From here you will see your ‘Active Profile Attributes’ and your ‘Archived Profile Attributes’. To add a profile attribute, click ‘Add Profile Attribute.’

On the next page, you can decide which roles you want to complete the Profile Attribute and who can view the completed Profile Attribute by selecting the desired results.
Then, in the text boxes provided, type in the question/prompt you want the user to answer, along with a display label. Finally, you can decide if you want the form component used to collect data from the user to be a text box or a dropdown menu. When you are done, click the blue ‘Review’ button. If the Profile Attribute looks good, click ‘Publish.’ Please note that you cannot edit published Profile Attributes.
Once you publish the attribute, it will live on your ‘Active Profile Attributes’ list. If you want to archive a Profile Attribute, you can do so by clicking the gear icon in the Actions column, and selecting ‘Archive.’ If you want to change up the order of the ‘Active Profile Attributes,’ you can do so by clicking on the ‘arrow icon’ and dragging and dropping the attribute to whichever space you see fit, except for the top three spaces which are the default Profile Attributes.

Managing Data Form and Rubric Templates
Please note that Data Forms are only available to Premium and Advanced systems. As a Network/System Admin, if you would like to add a Data Form Template to your system, you can author the template yourself and then adjust the visibility settings for which systems, groups, and roles have access to that template!
For more information about how to create a Data Form Template, please read this Help Center article linked here .
Sharing Exemplars Across Networked PLCs
Network Architecture allows users within a Networked PLC to view all of the Exemplar videos in every system of the PLC. As a Network Admin, click your ‘Exemplars’ tab in the top navigation bar. From here, find the section labeled ‘By PLC/System’ on the far, left-side panel. Here you can designate which system’s exemplars you wish to view. Clicking on any of the systems listed in this section will automatically generate the showcase page and exemplar collections for the system designated.

In order to organize the exemplar videos that are shared across your Networked PLC, you will need to organize these videos into Collections first within each system. Once those exemplars are organized into exemplar collections , navigate to the PLC page of the Management Panel, scroll down to the Exemplars section and select 'Exemplar Collections.'

Check the box on the upper left corner of the collection you want to share. If you want to share all, click 'Share All.'

LMS Integrations (If Applicable)
If you are a Network Admin/System Admin of an Advanced system or have purchased LMS Integrations as an Add-On, you can integrate with an LMS on your Management page. On the 'LMS Integrations' page, select the system you would like to modify. You will then be able to select the LMS with which you are integrating to receive your system's unique information. Each integration will get you specific settings regarding that LMS and also custom settings surrounding user accounts and any scoring.

API (If Applicable)
As a Network Admin/System Admin of an Advanced system or if you have purchased API as an add-on, you can manage Talent users from an external portal or user management tool using API. Select ‘API’ from your Management panel. Then select a system from the dropdown menu. You can then get more in-depth information by clicking on the link for our API Developer's Guide.

Not only will you be able to configure your API Settings per system, you will also be able to configure your API Settings for your Network as well! Overall, API will give you access to invite users, create and delete groups, get and set user information and groups, and get a user's notifications - among other functions.
Insights API (If Applicable)
As a Network Admin/System Admin of an Advanced system or if you have purchased Insights API as an add-on, you can use the Insights API tool to pull the export data available from each of the Insights reports in Talent. Select ‘Insights API’ from your Management panel. Then select a system from the dropdown menu. You can then get more in-depth information by clicking on the link for our Insights API Documentation Guide.

Much like the regular API settings, you can configure your Insights API settings to pull for both specific systems and your Network overall.
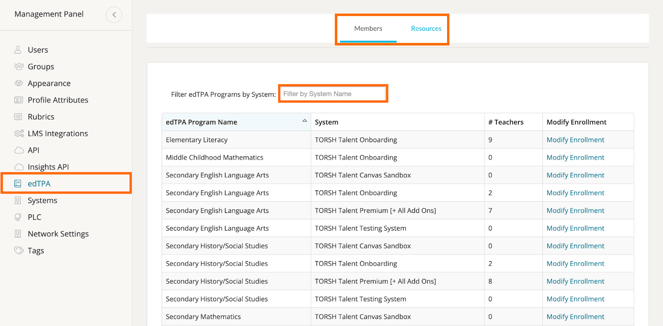
edTPA (If Applicable)
If any of your systems have edTPA or Learning Tutorials enabled, you will be able to manage these features by clicking ‘edTPA.’ From here you can filter by System Name in the search filter.
On the edTPA tab, you can ‘Modify Enrollment’ of your edTPA Programs, and ‘Add Resources’ for your enrolled members. Please reference our FAQ and documents on edTPA for more information on performing those management functions.
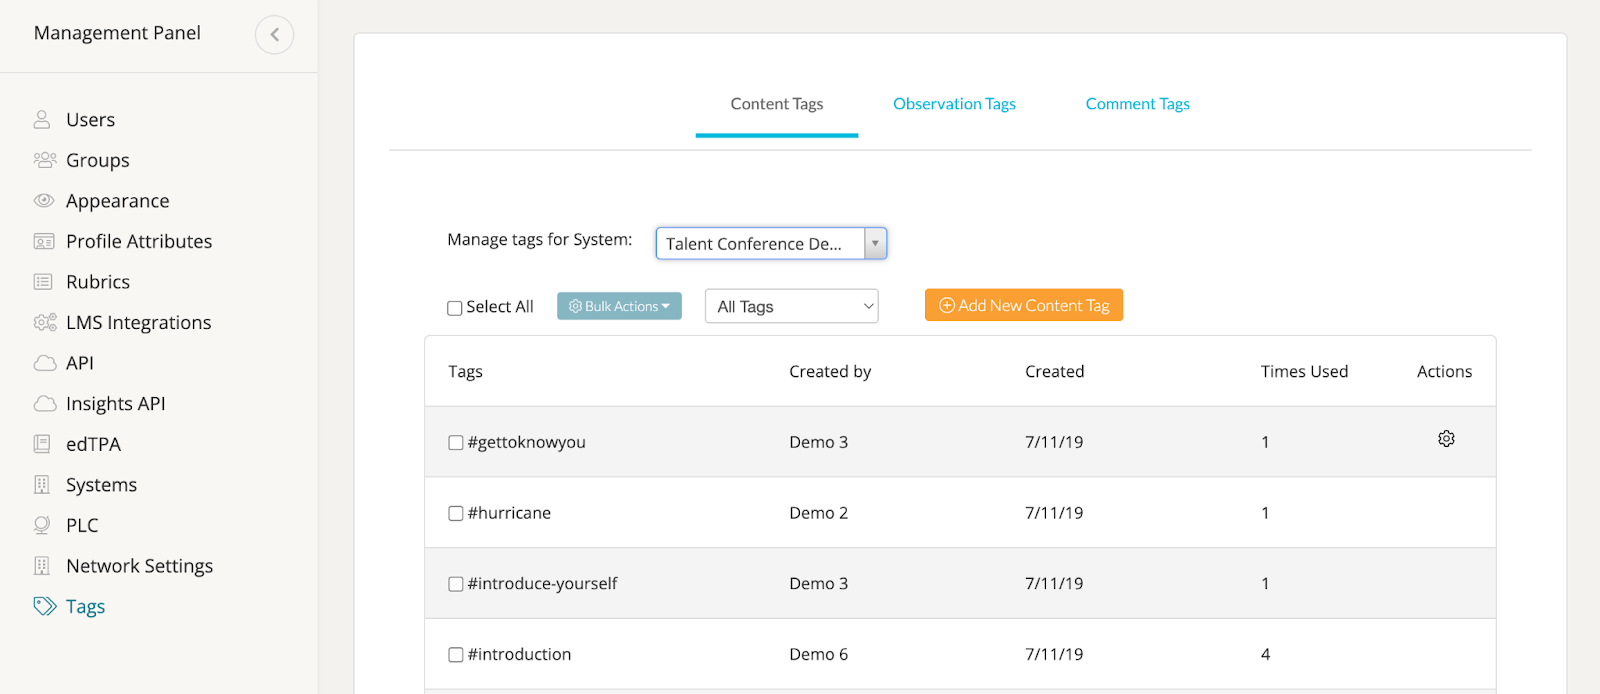
Content, Observation, and Comment Tags
As a Network Admin, you can create and manage tags for each of your systems in the ‘Tags’ section of Management. To create a new tag, first select a system from the dropdown list. Then click on the orange 'Add New Tag' button.

You will then have the opportunity to create new tags. The tags you create will be auto-suggested when tagging videos, files, and forums. If entering more than one tag at a time, separate each tag with a space. When entering a multi-word tag, combine the words with a '-'. Click the blue check mark when you are done.

To suppress a tag, hover over all the way to the right-side of the tag's row and click the red hand icon that appears. When you suppress a tag, it is no longer auto-suggested when tagging artifacts.

If you would like to suppress more than one tag at a time, select the tags you'd like to suppress then choose 'Suppress Tags' from the 'Bulk Actions' button.

Pulling Insights Reports
Network Admins can pull Insights reports similar to regular System Admins; however, only Network Admins have access to pulling reports for multiple systems across their Network!
To do so, simply navigate to any Performance or Activity report in Insights. You will now see a new dropdown menu in which you can select the specific system (or all systems) to base your report on.
Viewing and Managing Community Forums
As a Network Admin, you can view/post forums across all systems in your network. Simply go to the ‘Community’ tab and select the system you would like to view from the dropdown menu. This will not only load all of the public forum posts in that system, but you will now be able to post forums in the specified system by clicking the ‘New Forum’ button.
